Sunday, October 25, 2009

Finnally, something new.

It has been a long time since I posted and to be honest it has been a long time since I've actually made some progress on Percy. The last post was at the end of March. I didn't do much to the Mini over the summer, I guess the family and I were too busy enjoying doing summer things.

Anyway here's what I have been up to lately.

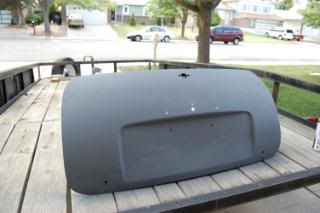
I finished up the boot lid. Put some primer on it:


And then I put on some flat OD Green:


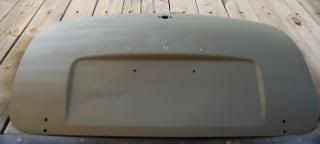
Now, some of you might be asking, "OD Green???" The answer is YUP! Percy is probably never going to see a professional paint job so he's going to be somewhat of a rat. So I'm completely comfortable with painting him myself with rattle cans. Also, what would be freaking cooler than an OD green Mini? Nothing!

I have to add that giving cars a home paint job is in my blood anyway. My dad paid me 20 bucks when I was a kid to paint his 1975 Dodge truck red...with a brush. I remember my dad brush painting his Maverick changing the white with green vinyl top to a rust red. When I was little our family car was a 1975 Dodge van bought from an ARMY surplus auction. DRMO at its best! My dad also painted that a turd brown color with a brush. As a teenager I used to be embarrassed to ride in it but now I truly understand the awesomeness that was that van. That is why I will proudly paint Percy and eventually proudly drive Percy with his amateur paint job.

Okay!! On to the bonnet! Last year I tried to convert the original bonnet from an MKIII to an MKI bonnet. The difference is the early bonnets didn't have a trim piece on the front and were just cleaner looking. Well, I found out the original bonnet was full of rust and was being held together with Bondo. I cut out the bad metal and welded in new...and it looked like it was going to work. But...while surfing Craigslist I found that a guy in Colorado Springs had a bonnet for sale. It looked pretty decent in the pictures so I made the trek down there and scored it. It was in MUCH better condition than Percy's original.

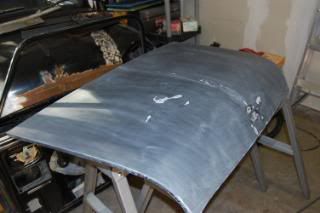
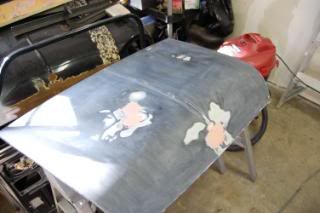
Here is the new bonnet with its front lip removed and sanded down: (you can see the original in the background)


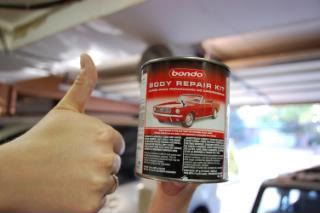
I had to bondo some low spots after hammering them out.


You can see that I filled in the holes for the badge. There will be no badges on this mini; no stinkin' badges!


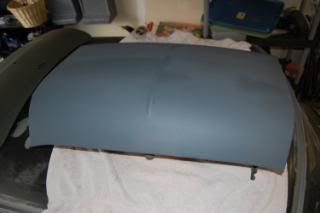
Here the bonnet is with primer. Nice and smooth.


So far that is it. Soon I'll finish up the right hand floor and then start on the left side.

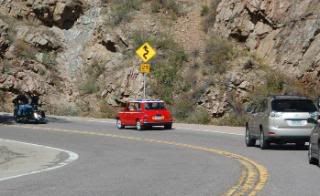
On another note...while cruising through the mountains with the family we spotted a red sportpack mini. It's always cool to see a mini on the road.

Monday, March 30, 2009

I'm Fixin' a Hole

Back before we left North Carolina I started working on Percy's body work. I cut out the driver's side outer sill, door step, inner sill, and a large chunk of floor. In the process I was able to weld in a new doorstep piece. I had to stop there because I ran out of time, we had to get on the road to Colorado.

Now the surgery continues:

I took off the driver's side door to make getting to the floor easier.

Door Off


These are the enemies of rusty Minis everywhere; a reciprocating saw with a metal cutting blade and an angle grinder with a cutting wheel.

Cutting Tools


Here is the section of floor I cut out previously. I cleaned up the edges.

Bad cut out


Here is a piece of the old floor. You can see the different layers of old patches. There are FOUR layers of metal!!

Floor Sandwich


Here is the floor patch panel. Thanks to my in laws!

Floor Patch Piece


I had to cut it to fit the area I cut out of the floor.

Trimming the Patch Panel


Here it is all trimmed up.

Trimmed Patch Piece


It was time for a beer break. Negra Modelo, good stuff. The wife and I found this boss sign at the Good Will store for a couple of bucks. Score!

Negra Modelo


Here's the floor patch panel all welded in.

Photobucket


I think it turned out well. Soon I'll paint over it with some Rust Bullet and put some seam sealer around the edges. Next I have to go to a sheet metal shop and buy a piece of metal so I can patch the rest of the floor.

I need to score some knee pads. By the end of the weekend I could hardly walk after kneeling on the cement for so long.

Friday, March 20, 2009

Rust Proofing the Gutters

This past weekend I decided to rust proof Percy's roof gutters with some Rust Bullet.

First I had to clean them with a wire brush wheel attached to my drill.

Small Cleaning the Gutters


I also cleaned up some surface rust that was on the roof.

small clean roof


I also decided to grind away the "Mini Cooper" sticker. Percy is just a Mini. Mini "Coopers" were Minis that were hopped up by John Cooper. They came with engine mods for more performance. The original "Coopers" go for big bucks nowadays.

Small Mini Cooper?


Going...going...

Nope! small


Gone!

Small Gone


I then removed the left rear quarter window.

Small LR Quarter Window Out


Then the left rear body seam cover. The body seam is in good shape with just some surface rust.

SM LR Seam good


The seam cover is in good shape too.

Small good seamcover


I'll have to get new clips. These hold the seam cover on the seam. These are pretty nasty.

Small Rusty Clips


I found a hole at the bottom of the left rear quarter window. I'll have to weld in some new metal sometime soon.

Small window hole


Here's the first coat of Rust Bullet on the roof gutter.

small first coat


Rust Bullet requires two coats with about two hours of drying time inbetween. So we decided to play darts.

Small time for darts


Nikki and I played cricket. We are training Eugie to be the score keeper.

Small score keeper


I scored a bullseye!

Small Bullseye


Nikki scored one too. She won the game!

Small Niks Bullseye


Of course darts make us thirsty.

Small Refreshments


Here is Percy with the second coat of Rust Bullet. All done for now.

Small All done

Friday, March 13, 2009

Bondo on the Butt!

Here's some work I did this past Sunday. I scored some Bondo and filled in some small holes left in the bootlid after welding and grinding.


Bondo filler


Then I sanded it all down after the bondo dried. I think I should pick up a random orbit sander, my arm was KILLING me afterwards!

Sanded down


While I was waiting for the bondo to dry on the bootlid I decided to start sanding the rear. I have to do this before I can put some primer on.

Started rear sanding


Then I got bored and started to pick at the right rear wheel well with a screw driver to see what was still solid and what was not. I found some more areas I'll have to patch.

You can see the holes in this picture.

Holes in the RR WW


Look at all this rusty goodness.

Rust Flakes

Mini Club

Now that I live in Denver I am actually near other people that dig Minis just like me. So much so that there is even a local Mini club. Minis of the Rockies is the name. Here is their website: Minis of the Rockies Check it out.

Photobucket


Every 1st Tuesday of the month they meet up at a pub in downtown Denver. The place is called Pint's Pub.

Pints Pub, Denver, Colorado


I was able to attend their last meeting. They are a very nice group of people. We were able to talk Minis for a couple of hours. At the end of the meeting they had a raffle and I won a really cool set of Mini pens!

Mini Pens


I'm sure I'll be back.

Sunday, February 22, 2009

A little bit of Rust Proofing

This past weekend I decided to try out some rust proofing coating a friend gave me while I was still in North Carolina. This was some potent stuff! I'm pretty sure it curled my nose hairs.

Rustproofer

It looked kind of old. Hopefully it still works. I will find out! It was free and I can't argue with that!

I put it on the bumper seam and the rear body seam.

Bumper Seam

It turns the rust a dark color. It says that it reacts with the rust and totally seals it, stopping it from progressing. Sometime next week I'll paint over it with some primer. If it doesn't screw the primer up I think I'll be in good shape.

I also removed the right hand rear quarter window and weather stripping to see what was underneath.

Quarter Window Out

It looks pretty good. Just a really small spot of rust. It will get sanded and treated with some more rust-proofer.

Tuesday, February 17, 2009

Presidents Day Weekend

This past weekend was a nice extended one thanks to Presidents Day. Here is some work I was able to do on the Mini.

Photobucket
I took out the rear windshield and right rear seam cover.

Photobucket
The rear seam is in good condition. I'll put some rustproof on it.

Photobucket
The rear glass looks good too.

Photobucket
The rear glass rubber and strip do not look so good. I'll have to buy new ones.

Photobucket
I welded up some holes on the boot lid.

Photobucket
Then I put the angle grinder to the welds.

Photobucket
Here's the bootlid with afterwards.

Photobucket
The boot is pretty rusty. It is solid in most areas but will require some patches. I'll put a coat of RustBullet down on it too.

Photobucket
With the rear windshield out I can use the rear parcel shelf as a tray to hold my beer. Driking and driving is a no-no, but drinking and rebuilding...

Photobucket
And I always like to be safe when grinding and welding.